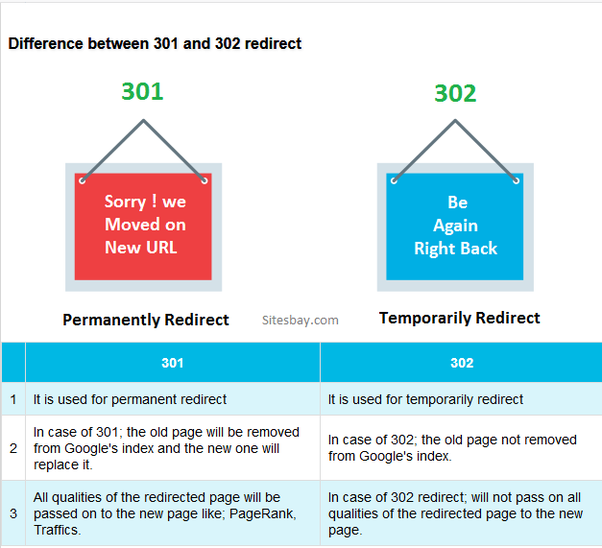
Today I’ll explain the differences between 301 or 302 redirects, and how they impact SEO below: 301 redirects: A 301 redirect tells search engines to content permanently moved and consolidates the old URL with the new URL. This it’ll carry over its value (and often its rankings too).
302 redirect: A 302 redirect tells search engines content has temporarily moved and DOES NOT consolidate the old URL with the new URL. The old URL will remain in the index and will still be able to rank as it did before.
- Why is it important to 301 redirect URLs for SEO?
- To preserve your build-up rankings. 301 redirects will pass as much value from the old URLs to the new URLs as possible. Redirecting old URLs to the most relevant new URLs
- You must find the most relevant new URL for each of the old URLs because you’re going to try and carry over the rankings the old URL has to the new URL. Therefore it’s super important to think about this carefully.
- If you don’t do the redirects may be seen as soft 404s and search engines won’t pass the authority over from the old URL.
You can easily set up redirects in SiteGround without editing any files.
Setup Redirects in SiteGround Hosting
Before explaining the setup process, remember the following things:
- You can use the redirection setup for WordPress or any other type of website.
- There is no need for plugins or file editing. You do not need the SG Optimizer plugin for WordPress sites in order to use the redirect function from the hosting account.
- Redirects work from the server-side smoothly without hassle.
SiteGround Redirects for WordPress Sites?
You may wonder, why you should use a redirect from the hosting account when there are plenty of free plugins available for this. There are good reasons for this. WordPress plugins will only work when you want to set up redirects within the site’s articles. You can’t set up a redirect from an HTML page from a subdirectory to one of your WordPress pages or vice versa. For example, the Redirection plugin will show you a warning when you try to create a redirect with a page from outside your WordPress installation.


You can see the warning message reading “Some servers may be configured to serve file resources directly, preventing a redirect occurring”. Though the plugin will not stop creating a new entry, you can check it will show you an error. In the end, the redirect will not work as intended.


Second thing is that WordPress plugins will not work for subdomain and domain to domain redirects. You can easily do this with the SiteGround “Domain Redirects” setup. Here are some possible scenarios that work like a charm with SiteGround hosting redirects.
- From one domain to another domain
- Subdirectory to a subdomain and vice versa
- Subdirectory or subdomain to main domain and vice versa
Remember, in all these scenarios the sites should be hosted in the same hosting account. As we have checked, regex redirect also works with the setup.
How to Setup Redirects in SiteGround Hosting?
Follow the below step-by-step instructions to set up 302 or 301 redirects in the SiteGround hosting account.
- First, prepare your old and new URLs for the redirects.
- Login to your hosting account and go to the “Websites” tab. Here, you will see all the sites available on your hosting account.
- Click on the “Site Tools” button under the domain you want to set up the redirect. This will take you to the Site Tools interface.


- Navigate to the “Domain” section and then to the “Redirects” section.


- Click on the “Domain” dropdown to choose your domain or subdomain and enter the URL in the “Path” text box. Here, you need to enter only the slug of your URL without the domain part.


- Select the redirect type as 301 or 302 and enter the new destination URL in the “Redirects to” text box. Here, you have to provide the complete URL including the protocol and domain.


- Click on the “Create” button to create a redirect.


Validating the Entry
SiteGround will validate the entry when type. You can see the green outline indicating the entry is valid and the red outline with a message showing an error.


However, after creating an entry you should manually test the redirection is working properly by opening the source URL in the browser. It should redirect to the destination path as per your redirection setup in SiteGround.
Managing Redirects
You can view all created entries under the “Manage Redirects” section. Each entry will have two options for editing and deleting. Anytime, you can click on the delete icon to remove the entry permanently from the setup. This will disable the redirect and you need to set it up again if needed. Similarly, you can click on the pencil icon to edit the entry to change the redirect type from 301 to 302 and vice versa.


Limitation in the Setup
We love this feature as it works well across all your domains and subdomains. However, there are some limitations.
- Source URL is a relative path while the destination is a complete path. It would be appropriate to have both these options as complete paths as it works across domains.
- You have only set up 301 and 302 redirects in SiteGround hosting. This is not sufficient when you want to use 307 or any other redirections.
- The list of redirects can easily go long when you have created many entries. It may cause inconvenience suddenly when you want to delete an old entry. There are no search boxes or reporting to speed up this process.
- There are no options to test the redirect unless you open the source page in the browser manually.
- You can’t temporarily disable a redirect for checking purposes. You always need to delete and recreate the entries again.
